When configuring BGP through the ASA, a basic understanding of how the ASA works and how BGP is implemented is very important. I would highlight some of my findings about the BGP/ASA relationship in this post.
1. The ASA (when in routed mode) is a HOP: This doesnt matter if we are configuring ibgp since BGP believes that the underlying IGP would take care of reachability to the neighbor but with ebgp, we need to explicitly state that the bgp neighbor is not on the same subnet. The ebgp multihop command is used to achieve this. Lets assume the following topology;
R2(f0/0) --- (ins) ASA (out) --- (f0/0) R3.
on R2 (and similarly on R3), we need to configure:
router bgp 1
neighbor 192.168.13.3 remote-as 2
neighbor 192.168.13.3 ebgp-multihop 2
When configuring ebgp multihop, we should also ensure that there is a route to the neighbor with a length greater than 0 (default route will not work) in the routing table..
Assuming we have on R2,
ip route 0.0.0.0 0.0.0.0 192.168.12.1
When we try to negotiate the BGP connection, it would fail (except R3 configured properly - which would always make R3 active). When we look at the debugs, we would see;
BGP: 192.168.13.3 active open failed - no route to peer, open active delayed 29090ms (35000ms max, 28% jitter)
But when we take a look at the routing table, sure enough, our default route is there...
R2(config-router)#do sh ip rou
Codes: C - connected, S - static, R - RIP, M - mobile, B - BGP
D - EIGRP, EX - EIGRP external, O - OSPF, IA - OSPF inter area
N1 - OSPF NSSA external type 1, N2 - OSPF NSSA external type 2
E1 - OSPF external type 1, E2 - OSPF external type 2
i - IS-IS, su - IS-IS summary, L1 - IS-IS level-1, L2 - IS-IS level-2
ia - IS-IS inter area, * - candidate default, U - per-user static route
o - ODR, P - periodic downloaded static route
Gateway of last resort is 192.168.12.1 to network 0.0.0.0
C 192.168.12.0/24 is directly connected, FastEthernet0/0
S* 0.0.0.0/0 [1/0] via 192.168.12.1
This is because the router actually searches for a route going to 192.168.13.3 and finds none.
R2(config-router)#do sh ip rou 192.168.13.3
% Network not in table
To fix this, we insert a route with a longer match in the routing table (doesnt have to be a host route, anything from a /1 would do)
R2(config-router)#ip route 192.168.0.0 255.255.0.0 192.168.12.1
That should fix things considerably and the BGP neighbor should come up.
2. The ASA does NAT: If the ASA NATs the address of the BGP peer, the neighbor statement should reflect this. Assuming we had a static statement on the ASA,
static (i,o) 192.168.13.2 192.168.12.2
Then on R3, we would peer with 192.168.13.2 instead of 192.168.12.2
neigh 192.168.13.2 remote 1
This would work well if Authentication is NOT configured.
3. Configuring BGP Authentication: BGP Authentication uses special tcp option for MD5 (option 19) to carry the Authentication information. This is stated in rfc 2385. The 16-byte MAC is computed based on a one-way hash function (MD5) generated from TCP header, the IP header, the password and a key. The following must be considered when configuring BGP authentication through the ASA:
a. Since the IP header is used in generating the hash, NAT cannot be used to change the ip address of the peers as this would break the authentication. If nat-control is enabled, the real and translated ip address must be the same.
b. Since the tcp header is used, the sequence number must not be randomized (default behavior of the ASA.) To stop randomization we can append the norandomseq option behind a static address mapping (that does not change the IP address) of the neighbor. This would only work in routed mode (of course)
static (inside,outside) 192.168.12.2 192.168.12.2 no randomseq
We can also disable random sequencing in the global_policy.
c. Finally, option 19 must be allowed to pass through the ASA for BGP traffic. This can be achieved by allowing it in the global_policy. The configuration on the ASA is shown below.
tcp-map BGP
tcp-options range 19 19 allow
!
class-map BGP
match port tcp eq bgp
!
policy-map global_policy
class BGP
set connection random-sequence-number disable
set connection advanced-options BGP
!
That would be all for now.
Further Reading
BGP through ASA configuration exmaple
RFC 2385: Protection of BGP Sessions via the TCP MD5 Signature Option
Amplebrain.
Thursday, October 22, 2009

Saturday, October 17, 2009
21 yr old CCIE : Interview with CCIE Agent
I was going thru CCIE flyer October Edition when I stumbled on Peter Ehiwe's interview. Peter is my friend, classmate and study partner. Details of the interview can be found here.
Quote of the day: "Peter you are so young just 21 years old. I have shoes older than you!" - Eman Conde (CCIE Agent) :D
Way to go bro!
Amplebrain.
Quote of the day: "Peter you are so young just 21 years old. I have shoes older than you!" - Eman Conde (CCIE Agent) :D
Way to go bro!
Amplebrain.
Wednesday, October 7, 2009
Shooting yourself in the leg
When doing personal study/'research', whether for the CCIE lab or some other exam, we get used to some practices that save time and aid troubleshooting. Many students have a template of initial config on their routers. Here is an example of what I would have on mine.
alias exec s sh ip interface brief
no ip domain-lookup
line con 0
logging synchronous
no exec-timeout
and a few other commands.
It is also common to turn on debugs when trying to troubleshoot a problem or understand a protocol.
While these practice definitely saves time, it should ONLY be used in a lab environment and the routers should be adequately CLEANED up before being put into production.
Recently. I got a call from a friend, he just put in a box that he used to study sometime ago into production and his router stopped resolving hostnames to ip addresses. The DNS server was properly configured and he had pointed to it using the ip name server command.
While reading through this post, the answer is obvious, but in a production environment with many issues and phone calls, it is a lot more difficult to decipher and you would probably need another pair of eyes going through your config.
We figured out that he had the no ip domain-lookup configured from one of his practice sessions and forgot to take out the command during clean-up. The issue was resolved and everything was fine.
Moral of the story: Cisco would arm you with a Gun and they wouldn't stop you from shooting yourself with a gun. Lab environment and production environments are totally different.
Turning on debugs in a produvtion environment could be a lot worse, It is important for a network engineer to be able to handle logs appropriatelyy but that's going to be a post for another day.
Have fun with your job and with your studies.
Amplebrain.
alias exec s sh ip interface brief
no ip domain-lookup
line con 0
logging synchronous
no exec-timeout
and a few other commands.
It is also common to turn on debugs when trying to troubleshoot a problem or understand a protocol.
While these practice definitely saves time, it should ONLY be used in a lab environment and the routers should be adequately CLEANED up before being put into production.
Recently. I got a call from a friend, he just put in a box that he used to study sometime ago into production and his router stopped resolving hostnames to ip addresses. The DNS server was properly configured and he had pointed to it using the ip name server command.
While reading through this post, the answer is obvious, but in a production environment with many issues and phone calls, it is a lot more difficult to decipher and you would probably need another pair of eyes going through your config.
We figured out that he had the no ip domain-lookup configured from one of his practice sessions and forgot to take out the command during clean-up. The issue was resolved and everything was fine.
Moral of the story: Cisco would arm you with a Gun and they wouldn't stop you from shooting yourself with a gun. Lab environment and production environments are totally different.
Turning on debugs in a produvtion environment could be a lot worse, It is important for a network engineer to be able to handle logs appropriatelyy but that's going to be a post for another day.
Have fun with your job and with your studies.
Amplebrain.
Sunday, October 4, 2009
Is Cisco Superstitous?
Cisco systems has released the IOS 15.0M - Mainstream version.
The sudden jump from the IOS 12.4T series to the 15.0 is remarkable. Why did they chose to skip 13.x and 14.x - could the software development team be Tetraphobic or Triskaidekaphobic?
I doubt that the are tetraphobic though - Since we had 12.4T :-)
What's new? New Features in the 15.0 IOS release can be found here.
More cool features. More fun stuff..
Enjoy!
Amplebrain :-)
The sudden jump from the IOS 12.4T series to the 15.0 is remarkable. Why did they chose to skip 13.x and 14.x - could the software development team be Tetraphobic or Triskaidekaphobic?
I doubt that the are tetraphobic though - Since we had 12.4T :-)
What's new? New Features in the 15.0 IOS release can be found here.
More cool features. More fun stuff..
Enjoy!
Amplebrain :-)
Tuesday, September 8, 2009
NAT and IPSEC Interoperability
After close to three weeks of silence... Here is the post I promised in my last post.
I have decided to avoid configurations in this post. The theory is boring enough :-)
We are going to examine two scenarios;
Scenario 1: The VPN device also performs NAT.
If the edge router/ASA does NAT and VPN, there are two basic options available;
1. Exclude the interesting traffic from the NAT pool
On a router, a route-map can be used to reference an access-list which excludes the VPN traffic from being 'NATTED'
On the ASA, the nat 0 command is used for nat exemption
2. If NAT is enabled for the VPN traffic. The order of operation must be understood.
The Cisco IOS order of operations performs NAT Translation before the crypto map is matched. The access-list specified on the crypto map must match the GLOBAL (Translated) address. Encryption occurs after translation.
The return traffic, decryption occurs before, before NAT Translation is performed.
Scenario 2: There is a NAT device on the path.
Remote Access VPN clients might have to establish a tunnel through a router (might be the local gateway) performing NAT. The inherent problems with this are described in RFC 3715.
The solution to this problems are described in RFCs 3947 and 3948. From a configuring standpoint, there's little to be done. The peers automagically detect a NAT detects a NAT device in between and switches to UDP encapsulation for NAT by default. The new UDP packets must be allowed by any access-lists for this to work.
Since NAT configuration is common in many network environments, It is required for network engineers to have a thorough understanding of the concept.
For Further Reading:
NAT Order of Operation
IPSec NAT Transparency
RFC 3715 IPsec-NAT Compatibility Requirements
RFC 3947 Negotiation of NAT-Traversal in the IKE
RFC 3945 UDP Encapsulation of IPsec ESP Packets
I have decided to avoid configurations in this post. The theory is boring enough :-)
We are going to examine two scenarios;
Scenario 1: The VPN device also performs NAT.
If the edge router/ASA does NAT and VPN, there are two basic options available;
1. Exclude the interesting traffic from the NAT pool
On a router, a route-map can be used to reference an access-list which excludes the VPN traffic from being 'NATTED'
On the ASA, the nat 0 command is used for nat exemption
2. If NAT is enabled for the VPN traffic. The order of operation must be understood.
The Cisco IOS order of operations performs NAT Translation before the crypto map is matched. The access-list specified on the crypto map must match the GLOBAL (Translated) address. Encryption occurs after translation.
The return traffic, decryption occurs before, before NAT Translation is performed.
Scenario 2: There is a NAT device on the path.
Remote Access VPN clients might have to establish a tunnel through a router (might be the local gateway) performing NAT. The inherent problems with this are described in RFC 3715.
The solution to this problems are described in RFCs 3947 and 3948. From a configuring standpoint, there's little to be done. The peers automagically detect a NAT detects a NAT device in between and switches to UDP encapsulation for NAT by default. The new UDP packets must be allowed by any access-lists for this to work.
Since NAT configuration is common in many network environments, It is required for network engineers to have a thorough understanding of the concept.
For Further Reading:
NAT Order of Operation
IPSec NAT Transparency
RFC 3715 IPsec-NAT Compatibility Requirements
RFC 3947 Negotiation of NAT-Traversal in the IKE
RFC 3945 UDP Encapsulation of IPsec ESP Packets
Friday, August 21, 2009
SSL VPNS Part 2: Anyconnect VPN Client
The SSL VPNS can operate in three modes, I have discussed the first 2 in a previous post. In this post, I would describe the Anyconnect VPN Client.
To set up the anyconnect VPN client, The Anyconnect VPN Client is stored on the flash and then downloaded and installed on the client. The VPN client can be removed after the session is terminated and can be left on the client PC depending on the router configuration. If the VPN client is left on the PC, subsequent connections would not require downloading the anyconnect client on the PC.
The anyconnect-win-2.3.2016-k9.pkg is the latest release of the anyconnect client on cisco site. You need a CCO account to download this.
Steps.
1. Copy the VPN Client to the memory of the Router.
WEBGATEWAY#copy tftp flash:/webvpn/svc.pkg
Address or name of remote host []? 10.10.10.2
Source filename []? anyconnect-win-2.3.2016-k9.pkg
Destination filename [/webvpn/svc.pkg]?
Loading anyconnect-win-2.3.2016-k9.pkg from 10.10.10.2 (via FastEthernet0/0): !!!!!!!!!!!
[OK - 2672571 bytes]
Verifying checksum... CCCCC OK
2. Install the client on the router
WEBGATEWAY(config)#webvpn install svc flash:/webvpn/svc.pkg
SSLVPN Package SSL-VPN-Client : installed successfully
WEBGATEWAY(config)#
3. Set up the local pool
WEBGATEWAY(config)#ip local pool ANYCONNECT 192.168.1.5 192.168.1.50
4. Configure the webvpn context to support anyconnect.
WEBGATEWAY(config)#webvpn context SSL
WEBGATEWAY(config-webvpn-context)#policy gr SSLVPN
WEBGATEWAY(config-webvpn-group)#function svc?
svc-enabled svc-required
WEBGATEWAY(config-webvpn-group)#function svc-enabled
! svc-enabled allows fall back to thinclient and clientless mode if ! anyconnect fails.
WEBGATEWAY(config-webvpn-group)#svc address-pool ANYCONNECT
WEBGATEWAY(config-webvpn-group)#svc keep-client-installed
! keeps the vpn client on the client after the session has been terminated
TEST Here are some snapshots from my PC
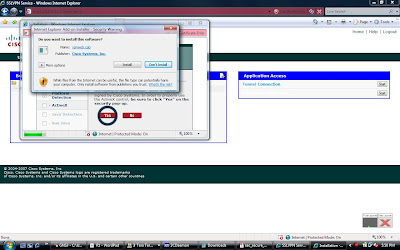
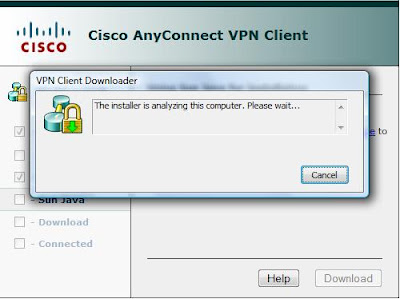
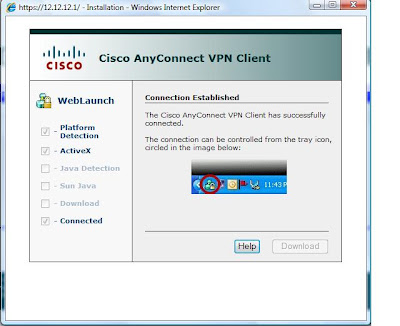
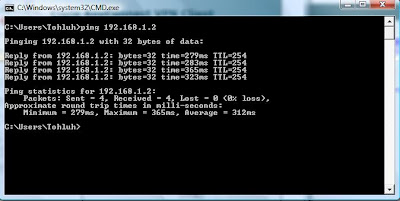
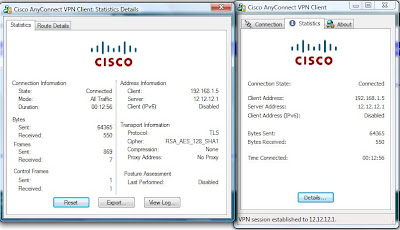 Test connectivity to the internal network..
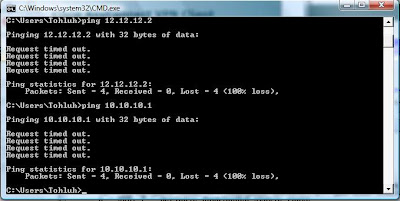
 But connectivity to the local LAN is lost...
To configure split Tunneling
WEBGATEWAY(config-webvpn-group)#svc split include 192.168.1.0 255.255.255.0
TEST Disconnect and reconnect. ;)
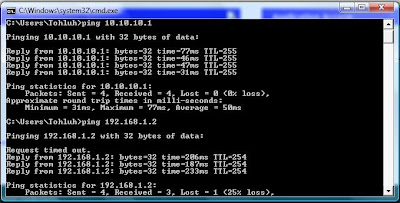
Anyconnect is up and running! :-)
N.B: When setting up SSLVPN on GNS3 using windows vista (like I did), ensure that the VPN client is copied to flash:/webvpn/svc.pkg as the router would not be able to modify the file system of the flash when you use the webvpn install command.
2. You might need to recreate a trustpoint after reloading the router.
3. If you are using the self signed certificate and Internet explorer, ensure that the webvpn gateway address is added to your trusted sites otherwise the anyconnect download would fail.
In real world scenarios, we might need to setup VPN and NAT for enhanced security (and connectivity), In the next post, I would discuss the nteroperability of NAT and VPNs.
Ciao.
Amplebrain.
To set up the anyconnect VPN client, The Anyconnect VPN Client is stored on the flash and then downloaded and installed on the client. The VPN client can be removed after the session is terminated and can be left on the client PC depending on the router configuration. If the VPN client is left on the PC, subsequent connections would not require downloading the anyconnect client on the PC.
The anyconnect-win-2.3.2016-k9.pkg is the latest release of the anyconnect client on cisco site. You need a CCO account to download this.
Steps.
1. Copy the VPN Client to the memory of the Router.
WEBGATEWAY#copy tftp flash:/webvpn/svc.pkg
Address or name of remote host []? 10.10.10.2
Source filename []? anyconnect-win-2.3.2016-k9.pkg
Destination filename [/webvpn/svc.pkg]?
Loading anyconnect-win-2.3.2016-k9.pkg from 10.10.10.2 (via FastEthernet0/0): !!!!!!!!!!!
[OK - 2672571 bytes]
Verifying checksum... CCCCC OK
2. Install the client on the router
WEBGATEWAY(config)#webvpn install svc flash:/webvpn/svc.pkg
SSLVPN Package SSL-VPN-Client : installed successfully
WEBGATEWAY(config)#
3. Set up the local pool
WEBGATEWAY(config)#ip local pool ANYCONNECT 192.168.1.5 192.168.1.50
4. Configure the webvpn context to support anyconnect.
WEBGATEWAY(config)#webvpn context SSL
WEBGATEWAY(config-webvpn-context)#policy gr SSLVPN
WEBGATEWAY(config-webvpn-group)#function svc?
svc-enabled svc-required
WEBGATEWAY(config-webvpn-group)#function svc-enabled
! svc-enabled allows fall back to thinclient and clientless mode if ! anyconnect fails.
WEBGATEWAY(config-webvpn-group)#svc address-pool ANYCONNECT
WEBGATEWAY(config-webvpn-group)#svc keep-client-installed
! keeps the vpn client on the client after the session has been terminated
TEST Here are some snapshots from my PC


 Test connectivity to the internal network..
 But connectivity to the local LAN is lost...
To configure split Tunneling
WEBGATEWAY(config-webvpn-group)#svc split include 192.168.1.0 255.255.255.0
TEST Disconnect and reconnect. ;)

Anyconnect is up and running! :-)
N.B: When setting up SSLVPN on GNS3 using windows vista (like I did), ensure that the VPN client is copied to flash:/webvpn/svc.pkg as the router would not be able to modify the file system of the flash when you use the webvpn install command.
2. You might need to recreate a trustpoint after reloading the router.
3. If you are using the self signed certificate and Internet explorer, ensure that the webvpn gateway address is added to your trusted sites otherwise the anyconnect download would fail.
In real world scenarios, we might need to setup VPN and NAT for enhanced security (and connectivity), In the next post, I would discuss the nteroperability of NAT and VPNs.
Ciao.
Amplebrain.
Thursday, August 20, 2009
Remote Access VPNS: SSL VPNS
The SSL VPN (aka webvpn) is the most flexible kind of Remote access VPN connection. All you need is an SSL enabled browser - Internet Explorer, Mozilla, Safari etc. I would go right to the configuration.
Network Diagram:

Web Gateway Configuration:
-Configure AAA for authenticaton:
aaa new-model
!
!
aaa authentication login VPN local
Configure the webvpn gateway and put it INSERVCIE
! webvpn gateway GATE
ip address 12.12.12.1 port 443
http-redirect port 80 !makes the router to listen on port 80
inservice !
Immediately after a webvpn gateway command is entered, a self-signed certificate is generated. This CA can be changed using the ssl trustpoint command.
Next the webvpn context is created...
webvpn context SSL
secondary-color blue
secondary-text-color white
!
Next, a URL-List is created;
url-list "list1"
heading "Available Pages"
url-text "Home Page" url-value "books.durable.com" !
For Thin client connection, a port-forwarding list is created.
!
port-forward "Ports"
local-port 3065 remote-server "TELNET" remote-port 23 description "telnet"
!
The pieces are tied together using the policy group command.
!
policy group SSLVPN
url-list "list1"
port-forward "Ports"
banner "Login Successful"
timeout idle 300
timeout session 3600
!
Next we set the default group policy, the AAA authentication list and add a gateway to the context.
default-group-policy SSLVPN
aaa authentication list VPN
gateway GATE
inservice
!
TESTING
I prefer to test with the end user - Here are some snapshots.

After successful authentication, we have;

When you click start, you have;

Finally, lets try to telnet to localhost port 3065

Just as we want it :-)
Up Next: Anyconnect :-)
Ciao.
Amplebrain.
Network Diagram:

Web Gateway Configuration:
-Configure AAA for authenticaton:
aaa new-model
!
!
aaa authentication login VPN local
Configure the webvpn gateway and put it INSERVCIE
! webvpn gateway GATE
ip address 12.12.12.1 port 443
http-redirect port 80 !makes the router to listen on port 80
inservice !
Immediately after a webvpn gateway command is entered, a self-signed certificate is generated. This CA can be changed using the ssl trustpoint command.
Next the webvpn context is created...
webvpn context SSL
secondary-color blue
secondary-text-color white
!
Next, a URL-List is created;
url-list "list1"
heading "Available Pages"
url-text "Home Page" url-value "books.durable.com" !
For Thin client connection, a port-forwarding list is created.
!
port-forward "Ports"
local-port 3065 remote-server "TELNET" remote-port 23 description "telnet"
!
The pieces are tied together using the policy group command.
!
policy group SSLVPN
url-list "list1"
port-forward "Ports"
banner "Login Successful"
timeout idle 300
timeout session 3600
!
Next we set the default group policy, the AAA authentication list and add a gateway to the context.
default-group-policy SSLVPN
aaa authentication list VPN
gateway GATE
inservice
!
TESTING
I prefer to test with the end user - Here are some snapshots.

After successful authentication, we have;

When you click start, you have;

Finally, lets try to telnet to localhost port 3065

Just as we want it :-)
Up Next: Anyconnect :-)
Ciao.
Amplebrain.
Subscribe to:
Posts (Atom)